I may have been foolish.
At our wool guild auction last spring, I bid on a bag of very smelly mohair goat fleece. I was the only bidder. For a reason. When the bag was opened, the room filled with the distinct odor of eau de goat. Nor did the contents have the appearance of the lovely soft white fluff we associate with mohair. Nope. It was a bag of things that looked like they had been coughed up by a herd of cats. That goat really had a good time from the looks of things.
Well, what the heck, I thought. I can give it a try, and if it doesn't work, I've got some cheap mulch and fertilizer. Thus began my Save the Mohair project.
And here is the pictorial story of my adventures with mohair, sorting, picking, washing really dirty fleece, picking, improvising drying racks, picking, testing, picking, and finally, using my English combs for the first time (and picking some more).
Testing-- will it work? or do I have compost?
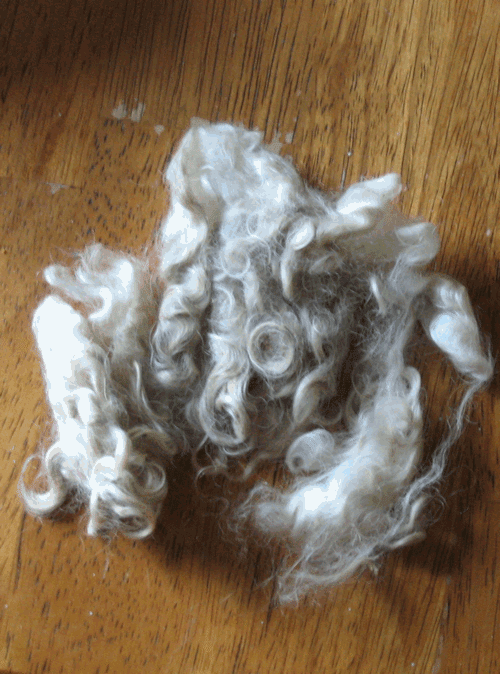
My camera shutter release had started to have problems (without letting me know), so I don't have a photo of the bag of goat fleece pellets. But here is a photo of some that I picked out to wash in my bathroom sink to see if they could be reclaimed. Situation looked good: a little vegetable matter, a little normal "goat matter" remained after washing and picking.
I used my cat slicker brush to open up and comb the locks. You can see in one of the locks here the results of a goat having a good time: That's a burr at the end of it. Harbinger of things to come.
Despite my trepidation, the test locks combed out very nicely with the slicker brush. I happily filled a small container with fluffy mohair, the remaining dirt coming out easily with brushing.
Washing the effing fleece
So I proceeded with step 2: the washing of each of the bags of goat fleece. That's when I realized that the three bags had been sorted into more or less pellets of similar condition. (Duh.) And I had picked the first pellets from the "best" bag. Random selection, not.
In for a dime, in for a dollar. I decided to wash the "dirty" bag and see what I had. I figured if I could get through that, the rest would be ok. My daughter had a red mesh laundry bag she gave me, and I dutifully distributed the locks in the bag, and filled my tub with moderately hot water and a lot of detergent. Carefully I laid the bag onto the water at one end of the tub, poked it into the water, and watched this happen:
My tub looked like this, after I emptied it by bucket onto my garden so all that good fertilizer would not go to waste:
Three washes, three rinses, and many buckets of water later, just for that one batch, I decided that I needed to try a different approach. So the rest of the fleece got divided up into smaller batches and soaked alternatively in a basin and a bucket. Easier to take out and dump on the garden.
In between they drained in a colander that now is part of my fibre processing equipment. The whole process operated like an assembly line, and took me less than a day.

Drying the fleece
The first batch dried on my deck on a tray I'd cobbled together from an inexpensive PVC quilting frame I'd dug up from somewhere deep in my closet, to which I clipped afore-mentioned red mesh laundry bag. Worked well set on my clothes rack in the sun.
Ok, still lots of "vegetable matter" (VM) and what I call "persistant goat matter" and "acquired goat matter". I'll deal with those later. Maybe. Either that or I still have compost.
But I still had all that wet fleece to dry. So I used clips to fasten some mesh fabric I'd bought to make washing bags (I'll get around to it, just not right now) to the shelves, thus:
Perfect! The mesh is fastened to the bottom rung on one side with three clips (the springy kind you use to hold fat sheaths of paper together), wrapped around the rung opposite, then up and across the rungs above, and fastened again with clips. The covered side protects the bottom shelf from the breeze. I found an old lace curtain (shredded by a certain cat who lives with me) and fastened it across the top to provide additional breeze protection.
I feel so clever. It all dried beautifully in the sun (with frequent turnings and picking out of VM). And when the sky began clouding over, I brought it in and was very proud of myself for not letting it get wet. It wasn't until later, when the sun momentarily came back out, that I remembered this:
Oh, well. Now the laundry is drying on the reclaimed clothes rack. Inside.
Processing???
All those locks? With a cat slicker brush? No way. That's what the combs are for.
My combs are a wonderfully (and frighteningly) impressive pair of huge English combs with five rows of very long and very sharp tines. They come with safety warnings, including keeping one's tetanus shots up to date. When I was told that they would do mohair, I was frankly skeptical. But I figured I'd give it a shot. Beat the heck out of doing all that gnarled up stuff with a cat slicker, or even a regular flicker brush if I had one.
Keep in mind I have never actually USED my combs before. This was to be my maiden experience with them. But heck, can't be any worse than wielding a machete, right? I've done plenty of that.
And I'm here to tell you that using combs is FUN! And, it worked.
Here I've just loaded the comb for the first time. Still skeptical. I was also being very cautious and carefully placing each lock on, pushing it into place. Here's what it looked like:
Later, I got more confident, and began lashing on with just a flick of
my wrist. Like a pro. :-] Makes it go faster, AND it is more efficient
because when you pull back after flicking, it helps align the fibres. Then I turned the comb sideways and began gently swinging the hand comb first through the ends to open them up, then deeper to pick up fibres.
Here I've taken the fibres off with the other comb, and I'm in the process of lashing it back on from the comb before pulling out the roving. I was so impressed that I stopped to take a photo. The combs really DO work for mohair! The short fibres, noils, and almost all the debris stayed behind. I pulled them off (carefully) and put them in a bag. Some might be usable for blending, some is likely to end up in the compost.
After I pull the roving, I break it and lay it together, then lash on again and repeat the process for as many times as it takes to get the result I am looking for. Because this mohair had so much non-fibre material in it, I took three passes. Here is the final roving, laying across the base comb:
And here is the final product, two fine mohair nests, ready for spinning:
Aren't they beautiful? Now I've got the technique down, the rest of the mohair should go quickly. Keep in mind that this was some of the worst of the "pellets" too. Now I can hardly wait to set up my combs again. And to spin this gorgeous stuff. I just wish I could figure out where I put my scale so I could weigh them.
PS: I have to get carders now, too. There is all this beautiful mohair waste just begging to be blended into wool....


