Saturday, December 10, 2011

Waffle weave towels and the lesson I learned about warping

Waffle weave fascinates me. So last summer I decided to do a set of hand towels in waffle weave for my bathroom.  My bathroom needed some color, so I picked several colors from my stash of 8/2, made up a pattern that looked fun on WeaveDesign, and calculated how many warps of each color I would need.  

When I calculated the length for a set of four towels, it was so close to the whole spool for some of the colors, I decided to use all of it and make six towels.  That meant a 12 yard warp, not the longest I've done-- but I wasn't taking some circumstances into account that would make this the most challenging warping up I've done (so far). 

Because I was using several warp colors, I decided to warp front to back, and spent the afternoon feeding the warp ends into the reed and the heddles, then tying then in neat little bundles onto the warp beam rod. 

June is normally pretty mild.  But this summer was the wettest, most humid summer Vermont has ever had.  That day began somewhat humid, but it wasn't too bad when I began this project.  But as the day went on, it became warmer and more humid.  As I began warping the loom, the temperature had hit the high 90s and the humidity was in the 90s too.  Though feeling the effects, I didn't think about how the warp might be affected. 

So far, things had gone reasonably well: I had had only two crosses on the loom, easily fixed, and was ready to wind on.  I set up my jugs, using extra to accommodate the smaller multi-colored bundles, tied on the warp bundles and prepared to wind them on.

What I didn't realize yet was that as the afternoon cooled into the 80s, the humidity approached, then exceeded 100%.  I was too busy to look out and see the mist coalescing in the late afternoon air. 

Bad mistake. Retrospect is such a wonderful thing.  I should have stopped there, and chained my warp and waited until a drier day (as the next day proved to be). 

But, oblivious me, I kept going.  As the cotton absorbed the moisture from the air, the strands swelled and began twining on itself and onto each othe, even across bundles! Normally, these fibres are a dream to warp, sliding past each other easily. Not that evening.  The moisture created friction, so that the fibres wouldn't slide past each other  Worse: each color behaved a little differently.  I had clumps of warp twined around each other despite the tension they were under, and refusing to budge.  No, I did NOT take any photos of this part! 

Maddenly frustrated and genetically stubborn, I stuck to it, winding on a few inches at a time, separating more warp, winding that on. As I realized what I'd gotten myself into, I wanted to give up and go to bed, but didn't dare, fearing what JellyBean (who loves string) might do during the night. So I kept going, finally got the jugs to the loom around midnight, and left them. (I figured the tension was high enough that JB couldn't do any damage.)

This should have taken 15-20 minutes max from the point I tied on the jugs. It took me six hours.  Midnight, and I was exhausted.  I learned my lesson: do not warp in high humidity.  Next time, I'm waiting. 

Okay, now to the fun part.  Next day the weather was much drier, and finishing the warp was a breeze (if only I'd waited... all those hours of frustraton!)  All I have to do now is weave.  Because I used so many colors in the warp, I decided to just use natural to weave. Here we go: 

Waffle weave on the loom-- very first towel
This was so fascinating to do!  And simple: it is very easy to keep track of the treadling because the pattern is so obvious.  I figured out how many repeats to make each towel come out the right length and put a thread marker after each six repeats. 

remember you can click on photos to enlarge!
It was intrigueing to see the flat weave, and to realize that once the towels were washed, the flatness would disappear and the towels would become thick and textured.

Stack of finished towels, one showing the two textured sides
...and green edges!

Tuesday, December 6, 2011

The Dornick Project

I decided to do something a little challenging, as a special gift to someone who has done a lot for me.  I asked her if she would like a table runner (YES!), and together we selected a twill pattern that pleased her and would be fun for me. She selected the colors: the warp an 8/2 cotton in camel (a lovely soft warm golden brown), and the weft, an 8/4 cotton in cream.  Finished, the runner would be 16 inches wide and five feet long, hemmed. 

The twill is a "broken" twill called Dornick's (perhaps to honor some long-ago weaver, as this is a very old pattern). A broken twill is one in which the twill lines are offset or "broken" in some way.  Here is the weaving draft I made up for the runner:

click for a larger view

As you can see, the angled lines of color do not meet.  I think this adds visual interest to the pattern.  The colors in the draft are not exact, but give an idea of how the pattern will look when woven, how it is threaded on my 4 shaft loom, and what treadles to push in what order!  It is really easier than it looks. 

Now, a quick review of the steps in making this project.  You'll find the same thing in any book on weaving, but I wanted to share my enjoyment in making this particular project by showing you pictures of it at various stages, thread to finish.  You won't learn how to weave from this, but I hope you will get a sense of my involvement and pleasure. 


The winding on of the warp: 

On the winding board
Warp shanks ready for loom


I divided the number of warp threads by 4, and wound four shanks on my board. The blue thread you see behind the warp is my guide thread.  It shows me where to wind and where to turn so that I don't have to think about it too much.


As I finished each shank, I chained it, and set it aside. You will see in a moment why I made up the warp this way.


Warp chains wound on breast beam


I am winding on front to back, so I wrapped the shanks around the front (breast) beam to hold them in place.  The looped ends are cut, and one by one, I thread them through the reed.  In this case, since the threads are smooth, I will also thread them through the heddles at this point, in the order called for by the threading draft.  I have four shafts, and each of them will be used. (My dream is to have an 8 shaft loom someday).  

Here is a photo of the other side of the shafts, showing the threads hanging in small tied bunches where they have already been threaded.  Others are waiting at the reed to be threaded into the heddles. 

Back of loom as warp is threaded


The next step after all the heddles are threaded is to tie on the bunches to the warp beam.  I somehow failed to get photos of this part!  I think I was anticipating the next part, which is a lot more challenging: winding the warp on all by myself while retaining even tension on all the warp threads.  Fortunately, there are ways....

Warp under tension using secret method
The secret: water-filled jugs!


Warp winding on

And voila, the warp is pulled to the loom evenly, with rulers inserted between layers to keep them separate and maintain an even tension during weaving.  Magic!

When the jugs are close to the loom, the warp can be untied and brought carefully to the breast beam.  Then it is tied in small bunches in front of the reed to hold it in place.  Each bunch is then carefully tied to the front apron rod, making sure to keep the tension even (this usually required retying 2 or 3 times). 

Then the weaving commences. First, some stray material is woven in to spread the warp evenly.  In this case, I used the dreaded blue warp. (Actually, I liked the effect of the darker stripe, and the next time I make a runner or mat using dornick's, I am going to try adding contrasting stripes at the ends.)

Spreading the warp for weaving
And the first few feet of dornick's twill emerges:
The red thread marks the first foot of weaving

And a few days later... voila!  The finished web:

It drapes well, don't you think?
And the finished runner, hand-hemmed and in the home of the recipient, who is very pleased with it.  That makes me happy!

Dornick's twill runner, hand-hemmed.
A close-up of the pattern:

Monday, December 5, 2011

Rag rugs and the warp from hell

My very first weaving project, in the fall of 2010, was a real rag rug, as in real rags.  I cleared out a bunch of old clothes from my closet, drawers, and stored boxes, and cut them up into strips. These were things I doubt even the thrift shop would want.  The resulting rug is a little rustic, a little uneven, full of bumps where I cut through seams.  But it was satisfying and fun to weave.  Attractive in a funky sort of way, and comfy, even with the bumps.  It is my bedside rug. 


The loom came warped wtih blue cotton rug warp (courtesy the previous owner), so I used it. That rug warp fought me every step of the way, hanging up and needing constant adjustment. I thought the problem was the way it had been warped (badly) by the previous owner,  Well, that was part of it.  Then when I went to use the same rug warp from spools that also came with the loom for two smaller rugs, I found out it was more than bad warping. It was bad warp.
 
I  combined the blue rug warp with some 3/2 orange mercerized cotton to create some contrasting stripes. Each rug was to be about 24 by 30 inches when finished plus fringe, making for a little over 3 yards of warp, a pretty short warp.  But the blue was so ... so ... um ... grabby (cheap, short staple cotton) that it tangled every inch of the way, on anything it could: itself, the heddles, the reed, me.  I finally liberally slathered hand lotion on my hands, and ran them down every inch of every warp thread.  It worked.  FINALLY I got the loom warped!  (This is not the ultimate warping horror story, however. That comes later.) 

Working on the first rug
The weaving was easy, and by this time I knew how to keep the selvages even.  The "rags" are commercial fabric factory mill ends, sewn, rolled and cut into rounds of  strips (from 1 to 3 inches in width), then sold by the pound.   I had acquired a box of these, mostly cotton, at the studio sale.  (And now know two sources for these wonderful rags.)  So here are the results, one a gift for one of my daughters and the other a gift for her daughter:


Darcy's rug, for the back door


Keely's rug, for her jungle bedroom

The "barrel" look is due to my camera: the rug selvages are straight, I am proud to say.

Also glad to say that the blue warp from hell has been relegated to utility string, and I now have several spools of well-behaved 8/4 rug warp.  Some of which is about to be warped up for two more rag rugs. 

By the way:  8 is the size of the threads, and 4 is the number of them twisted together, so it refers to the size of the yarn or thread.  Each material (cotton, linen, wool, etc) has its own sizing convention, so part of being a weaver is figuring out how the heck to pick materials that play nice together, and more or less turn out the way you expected them to.   Weaving is sometimes a surprise.

Wednesday, November 16, 2011

More spinning fun

Well, I had some fun today.  Some frustration, too, though even at the time I kind of wish someone had been here with a video camera to catch the action. It is the kind of thing that could go viral on YouTube.  Instead, I'll have to make do with words, which at least will let me lie about the worst parts (which, if viewed, would also be the funniest).  I'll try to be honest. 

I ran out of spools. I have four, and had only one empty. You ALWAYS should leave one empty.  There are ways around it, but it's easier to just always have at least one empty so if you start a new fibre or kind of yarn, it's by itself.

Remember those spools of BFL singles I was so proud of?  Not perfect and not completely consistent, but usable. I decided to ply them, since they were pretty skinny and I couldn't see winding them off.  I plyed from the bobbins, using the Lazy Kate, feeling like a real spinner. The plying went pretty well, once I got the tension right, and figured out how to use my hands to keep the twist fairly consistant.

It came out okay, if a little twistier than I'd like. But not bad for the first skein I plyed on the wheel.  (The black is a piece of yarn I used to tie the two ends together.) 

After washing to set the twist, I got around 200 yards of yarn if you ignore the occasional lump or skinny spot, or unbalanced ply. My expectations are still pretty low.  Besides, this yarn will work up real pretty in a scarf.

Well, now I had three empty spools, and the last one is the one that should have been videotaped. I think it was the second one I'd done (after the one I dyed as a single, and watched turn into a curly donut). I decided I didn't want any more curly donuts, and was pondering how to ply it. I'd wound my spindle yarn on balls to ply, but this time I decided to try something I'd been told about: using my ball winder to make a ball, and then pull on both the inside end and the outside ends to ply.

Oh, I wish I had pictures of this, but the fact is, I didn't dare move to get my camera.  My singles were still a little overspun, and as I began to ply, the ball collapsed into a curly mass that came out in already twined ladders on either side of me, then grabbing the other side and making globs.  I was trapped, wrapped on both sides by yarn singly-mindedly trying to do what it does best: tangle. 

I shut my eyes, relaxed all but the fingers holding what little control there was over the yarn, and breathed, emptying my mind as much as possible. It is hard to tell what might have happened had I not done that. 

Then, I courageously took my scissors, cut off what was in front of me, and carefully and mindfully separated the two ends.  Then I did what I should have done in the first place, the hard way: holding the curly ball between my legs, I slowly wound each end onto one of my little green balls a little at a time, gently turning the curly ball every few inches, until nothing was left of it.  Then I cut the yarn, put one ball on one side and the other on the other, removed the twisted mass on the bobbin, and started over again.  This time it went easily. 

But it is still on the bobbin because I don't want to deal with it right now. 

Saturday, November 12, 2011

Chartreuse project, morphed

  Off the loom, I laid the weaving out on the floor so I got a good look at the whole thing.  At this point I was beginning to rethink the table topper idea: I kind of liked those red things hanging off the edges that would need trimming if it were a table topper. 

To bring out the texture, I filled my tub with very hot water, swirled in some detergent, and gently laid the chartreuse weaving in.  I could see the yarn drawing up even as it settled into the water beginning to form texture.  I pushed the weaving to and fro very carefully, watching to see how the yarns interacted. 

I was especially curious to see how the red pattern did against the other yarns: I was afraid that they might pull in so much that it would distort the pattern.  But the red held its own, and stood out just enough to add texture of its own.

After the weaving was thoroughly soaked and had developed a strong texture with no undue drawing in, I pushed the weaving to the far end of the tub.   Then I drained the hot water, and ran in cold water. Again I laid the weaving in and gently pushed it down and moved it back and forth enough to rinse it.  I repeated the rinse, then drained tub again.  After pressing as much water out as I could, I laid the weaving on a heavy towel, carefully folded it up, and stomped on it to express as much water as possible. 

Then I laid it out on top of the cardboard that covers my loom to dry. 

And thought some more about what it was to be. 

I had left long fringes to allow for cutting if they felted.  They did felt, but I liked them long.  I liked the way the ends of the red inlays looked hanging out.  I liked the way the red inlay off-circle looked upright and not covered by stuff. 

After it dried, I laid it on the table. Nope.  Then, just to see what it would look like, I threw it over  folding screen in the corner:


Yep.  Wall hanging. So, tomorrow I will go out and rummage through my stack of  odd sticks and branches (don't ask), and find one that I can use to hang this from.  I've decided to let the top fringe hang down, and lash the hemstiched top edge to the branch using the warp material. 

Tonight, I rest. No, first I eat.  Then I write. Then I rest. 

Monday, November 7, 2011

The charteuse project

A few weeks ago I decided to weave a scarf to donate to a fund-raising project. So I picked out some soft chartreuse felted 2ply warp from my stash (some yarn I picked up at a studio sale with no particular purpose in mind), and some gold for warp, and red for accent.  Warped up my loom for a scarf and wove a sample.


 I knew the yarns would shrink at different rates, something weavers often take advantage of to add texture.  Sometimes it works out. Sometimes it doesn't.  The visual texture of the sample looked nice, but the gold turned into something bristly. Not a scarf, then. 

So, maybe make the warp wider , and weave a table topper.  I chose a different color weft, a green more subtle and slightly darker than the chartreuse, to make the chartreuse a little more subdued.  When I washed a sample of the new wef, it seemed that it  might be a bit more drapey when washed, but still give a sense of texture.  I kept the red for accent, but decided to lay it in rather than weave it in.  So here goes:

I drew a simple cartoon drawing of what I wanted to aim for,  The cartoon is a general guide for composition but not a pattern. I would lay the pattern in by eye as I went, and expected that the end result would vary and be somewhat asymmetrical. As it turned out, it was less asymmetrical than I'd anticipated! 

The dreaded shrinking shed

As I am approaching the end of the piece, I notice that the shed is beginning to get smaller. And smaller....

So I decide to weave this end with a similar size double red line and seven inches of plain weave, same as the other, though the design elements are asymmetrical and not centered.  Keeping my fingers crossed I cut it from the loom:


I have hemstitched both ends to stabelize the weaving, which at this point,unwashed,  looks something like canvas.  I left about 7 or 8 inches for fringe.  The finished fringe will not be that long,  but I wanted plenty to work with.  In my sample and preliminary tests, the warp ends felted well together and I am hoping that it will be stable enough for me to cut off the knots and leave a trim 2.5 inch fringe sans knots.


 Each of the fringes is just two warps, twisted singly, then twisted the other way by hand and knotted.  I never thought I'd want one of those fringe-twister doo-hickeys. But on this project, one sure would come in handy!  I'm trying to making meditation out of it! 

When the fringe is finished (give me a few days), then comes the suspenseful (and unnerving) part: washing to shrink and full the yarns.  Will I come out with a fascinating minimalist texture, or a confused mass of yarn that won't lie down flat?  Stay tuned....

Tuesday, November 1, 2011

Mona the Magnificent

Off topic, but with some relevance, since Mona is my studio manager, as well as the household matriarch.

Yesterday evening was the 14th anniversary of the day I found Mona the Magnificent, in a wildlife refuge along the Yakima River in central Washington state. She was about 10 weeks old, and apparently the only survivor of a litter of kittens that had been dumped (why do people do this?).  I feel almost as if she called me: I was homebound after work, the sun was just below the hills, and for some reason, stopped to take pictures of the light along the edges of the hills and outcrops.  This is a painting I made from one of those photos:


Then I heard what at first I thought was a hawk- usually there are many, but they hadn't come home to roost yet-- the trees along the river were empty.  As I listened, the sound got closer, and for all the world sounded like a cat. 

Feeling a little foolish, I stood in the middle of the meadow and called "Here, kitty, kitty, here, kitty".  The sound stopped and I figured either that the wind was playing tricks with sound, or there was a cat and it was headed for the sound of my voice.  So, playing it safe, I kept calling. 

A few minutes later, a tail popped up out of the grass. It took nearly ten minutes of coaxing, but I finally managed to get this beautiful, skinny, cat into my jacket, where she clung as I drove, first to the pet store, and then home. 

The next day to the vet for shots and an examination.  A few months later, she traveled cross-country with me to New England, and has been my companion ever since.  By the time she was 6 months old, she weighed nine pounds. At one year she weighed 12 (ever been tackled by a 12 pound kitten?) and was still growing. 

Her weight as an adult has fluctuated between 18 and 22 pounds, depending on time of year, and there is a lot of hair on top of that.  She is truly magnificent: a Norwegian Forest Cat all the way through. 

Mona in her studio observation post yesterday:


Mona the Magnificent
(Not bad-looking for an old gal, eh?)

Monday, October 31, 2011

Wild Carrot Flowers- and what else I did today

Remember this from my Learning to Spin post?


This is my first attempt on my wheel, what I called my "Random Overtwist", hanging to dry to set the twist, or so I hoped.  It seemed to work.

I found my decoction of wild carrot flowers, and to my delight, it was in excellent condition. I had decanted it after straining and reheating into a sterilized wine bottle, corked it, and stuck it in my pantry. 

So I decided to dye my Random Overtwist and see what kind of yellow I got. 


First I mordanted the small skein with alum.  That provided the first amusement of the day.  As soon as I dropped the skein in the cold mordant solution, it regained all its curl:


I use chopsticks as lifting and poking sticks, so I stuck this one right in the middle of the skein and left it there as it curled in on itself so I wouldn't lose where the opening was! 

Watching it curl up when it got wet gives me a clue to weave LOOSELY when I use in a project!


Simmered one hour, and then dropped it into the preheated dye bath.  What happened next happened too fast for me to take a picture...


The wild carrot decoction was so pale that I thought it would take some time for the wool to pick up color, and I was expecting a very pale shade of yellow.  Wrong!

I had turned around to clear some things off the counter, and when I glanced back at the pot a few minutes later, the wool had already turned a clear, strong yellow.  I pulled it and let it drip as it cooled: here it is hanging off the chopstick (thankfully NOT a tangled ball of twists!).  Then I washed and rinsed it, and hung it, weighted slightly, to dry. 


And here it is, dried and twisted into a little ball, next to the purple bean yarn.  Don't they look purty together?

I can do black bean dye this winter, every time I make black bean soup.  And late next summer I should have a lot of homespun to dye this marvelous clear yellow. 


By the way, the wild carrot flower decoction has a wonderful smell, a little fruity, a little flowery, with a touch of spice.  It made my house smell wonderful.

____________________________

And now:  The other things I did today: FINALLY got my fall bulbs planted.  Yay

And I made a loaf of bread. Love, love, love my bread machine:

I've had this machine for over 10 years, and it is still going strong.  It's paid for itself many times over.  Hint: I take the paddle out before the last rising so there isn't a big hole in the bottom of the loaf. Much nicer. 

Sunday, October 30, 2011

Forays into natural dyeing

Like everybody else, when I was a kid, I learned to dye with onion skins. That set a switch in my brain.  From time to time over the years I've played with plant colors.  Then I started painting and got my color fix there. When I started playing with fibre, that long-ago switch turned on.  It had just been dormant: I already had two books on natural dying.  So I got two more, and started cruising the net looking for people with the same activated switch.

The next thing I knew, I was out wandering around the neighborhood collecting leaves, bark, flowers, and cooking them in specially reserved pots.  I now have an odd variant of the kosher kitchen: one set of pots and utensils for cooking food, another for cooking dye plants. 

It's interesting, because you never quite know what you are going to get. You control what you can, but there are too many variables to be of what is coming out.  So there is mystery.  Fun and mystery, and you get to dabble in ancient arts.  What could be better?

For this fall's experiments, I made up mini-skeins from a cone of commercial natural 2-ply wool I picked up at a studio sale (where I lost my head but got some great yarn and tool bargains).  Here is a quick summary of results.  At the bottom, a list of some useful books.


Alfalfa (lucerne):  I found an interesting legume in my driveway-- birds plant all kinds of things out there.  I was wandering around crushing leaves in my quest for possible dye plants, and this one turned quite dark when I pinched it. So I gathered up some shoots, and made a little batch of dye solution in my small pot.  I was pleased with the lovely soft sagey green these two little alum-mordanted samples took up.  The legume leaves looked familiar, and I confirmed that it was alfalfa.  Who knew?


Rhubarb root (left side):  I had dug an overgrown patch of rhubarb late this summer, and trimmed off the old part of the root.  It had some good pieces, so I chopped those up and boiled them for about an hour. I actually got two batches from the roots; there was so much color that I covered the drained roots again and got a dye bath nearly as intense as the first.

I used the first to dye the five mini-skeins on the left, pulling out a skein after 1 minute, 5 minutes, 15 minutes, 30 minutes, and 45 minutes.  The first four were alum-mordanted, the last was not.  I do not think yarn needs to be mordanted for rhubarb: it contains a good amount of oxalic acid, which is a natural mordant.  As you can see, I got a good range of colors ranging from a medium light yellow to an almost rusty orange.  This bath is still good for more color! I do not think I could get a pale yellow until it is almost exhausted.

Goldenrod flowers (top right):  The two skeins at the top right were done in a goldenrod solution. I simmered the flowers for one hour, let cool, and strained.  The wool was added and simmered for one hour and allowed to cool.  Since most yellow in plants is due to the pigment carotene, the overall tone is similar to the rhubarb root, but softer overall, and, in this case, with a little green undertone, as I had left the top leaves on the flowertops.

The two skeins at bottom right in the photo are the alfalfa dyed skeins above. I adjusted the color for the yellows so the color isn't quite right for the green here.


Black beans:  A year or so ago I noticed that a towel I'd used to clean up the stove after a black bean boilover stayed kind of blue for a long time. So I decided to try it as a dye..  This was from the first soak water for black beans I was preparing a fe days ago for soup.  I poured it off into my large dyepot, and added three larger alum-mordanted mini-skeins to it.  I simmered them for an hour, removed one immediately, and let the other two stay in the dyepot overnight. 

I was pleased with the dark, purplish color they all had.  It is hard to see the difference in the photo, but the one on the right is slightly paler and dustier in tone than the other two.  This is the one I removed immediately to wash.  The two I left to sit overnight have a deeper and richer color.  I suspect too that different strains of black beans, or differences in the soil they are grown in, might make a difference in the color one gets.

Wild carrot flowers:  I still have some dye solution I made up from wild carrot flowers.  I set it aside (got a bug and never got around to it).  If it isn't too off, I might give it a try and see if I can get a yellow that would go well with the black bean purply color.


A few books to try:

  • A Dyer's Garden, Rita Buchanen, 1995, Interweavebooks.com
  • A Weaver's Garden, Rita Buchanen, 1987,Dover Publications, Mineola, NY.
  • Dye Plants and Dying-- a handbook, first printing 1964 (it went on for a number of printings).  Collection of pieces originally published as Plants & Gardens, Vol.20, #3.  Brooklyn Botanic Gardens, Brooklyn, NY.  Readily available used.  
  • The Complete Guide to Natural Dyeing, Eva Lambert & Tracy Kendall, 2010, Interweavebooks.com
Newer is not necessarily better.  The Lambert book is pretty and has a lot of info, but is not well-laid out, and it focuses on a few plants, many of which are exotic and must be purchased. It does eliminate the use of toxic metal mordants, which is a good thing.

I prefer Buchanen's book The Dyer's Garden, which is clearly written and easy to follow, with wonderful photos of yarn she's dyed with plants.  Both her books include garden and horticulture ideas and suggestions, with discussions of a number of plants.  She does include discussion of metal mordants, but addresses the toxicity issues well.  I'd suggest skipping chrome, which is highly toxic, and must be disposed of at landfills that accept hazardous materials.  Alum, tin, and iron are safe, and copper can be used judiciously with safety precautions.

The booklet by Boston Botanic gardens is a treasure trove of information: history of dyestuffs and the dyeing industry that developed in Europe, home dyeing, anthropological studies of dye materials used in other cultures.  These vary in depth and quality, but are a great source of ideas for contemporary home dyers to try out.  Ancient mordants are discussed, some of which are fascinating in themselves.

Learning to spin on a wheel without creating a mess

This is it in a nutshell:

1.  The first batch I tried spinning. Well, no-- the very first little bit was so awful I wound it off and stuck it in a box.  This small skein is better: I was starting to get the hang of letting the darn yarn wind on by itself, just not very well yet. I call it "Random Overtwist".  It has been washed and is hanging to dry to set the twist so it doesn't totally kink up when it is released.  I hope.  I intend to dye this some wild color and call it "art yarn".  Maybe use it someday in something with inclusions to distract.


2.  Try number 2: Still overtwisted, but with some areas that look pretty good, more consistency in thickness, and the joins are cleaner.  I am still using my wheel in doubledrive, meaning that the same pulley controling the spin also controls the bobbin wind-on speed, via a loop around a kind of gear that in spinning is called a whorl. There is an adjusting knob that I haven't got the hang of yet. This bobbin is on  my lazy kate now.


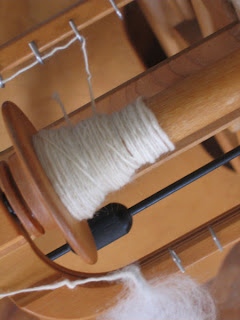
3.  Okay, I changed from double-drive to Scotch tension.  This is where the belt drives only the spinning of the yarn, and a separate line, called a brake, controls the bobbin takeup speed.  It has it's own control (the black knob thing at the bottom, and I finally was able to coordinate the spinning and the pull-in to produce a pretty consistent yarn.  My fingers learned how to both draw out fibre from the wool, let the spin in, and release it to draw in to be wound on the bobbin.  Not as good yet as I am on the spindle, but getting there, and it's lots faster!  This I am spinning to ply. 


To compare, here is a photo of some of my plyed spindle yarn, and a singles still on the spindle, from the same batch of BFL.  I did this just before getting my wheel. 

Thursday, October 20, 2011

The new toy

My Schacht Matchless came home with me today.

In my living room/studio, with the little, very old sewing chair I found years ago: perfect!  In the center background is my sidekick, Rudy (on the red blanket), in his usual survey-my-kingdom position.  This is the part of the living room that actually looks like a living room.


JellyBean, one of my studio assistants, is checking out the wheel, now  tucked up against the end of my loom.  That's Mona, my other studio assistant, in the background tucked into her daybed.  All that wonderful light is coming from a huge bay window at the end of the living room. 


A wider view of the studio end of the living room, so you can see the loom (and it's cardboard cover), the easel, and all the rest of the clutter.  JB is the reason my loom is always protected with a cardboard cover when not in use. She thinks that chair is hers.  Trouble.